Home Desserts
Category:

Desserts

Layers of goodness – Hazelnut Dark Chocolate Mousse Sphere (with Coffee Creme Patissiere & White Wine Poached Pear & Crispy Chocolate Base)

This post is all about celebration – about finishing my first basic term @LCB passing all my assessment, about flying to Brisbane in a few days for vacation, and about finally successfully making a mousse sphere for the first time (after contemplating on it for a thousand years). This hazelnut chocolate mousse sphere is my cup of tea, hands down – it marries my favourite flavours into one dessert that tastes absolutely divine. I’ve always wanted to make mousse spheres but I was too scared to, until I recently watched Zumbo’s just dessert which motivated me to be a better “dessert maker”. While I was watching all those amatuer home-bakers produce their eye-opening, beautiful desserts, my heart ached for creating some of my own.

hazelnut_mousse_sphere_with_mirror_glaze4hazelnut_mousse_sphere_with_mirror_glaze7

IMG_7758

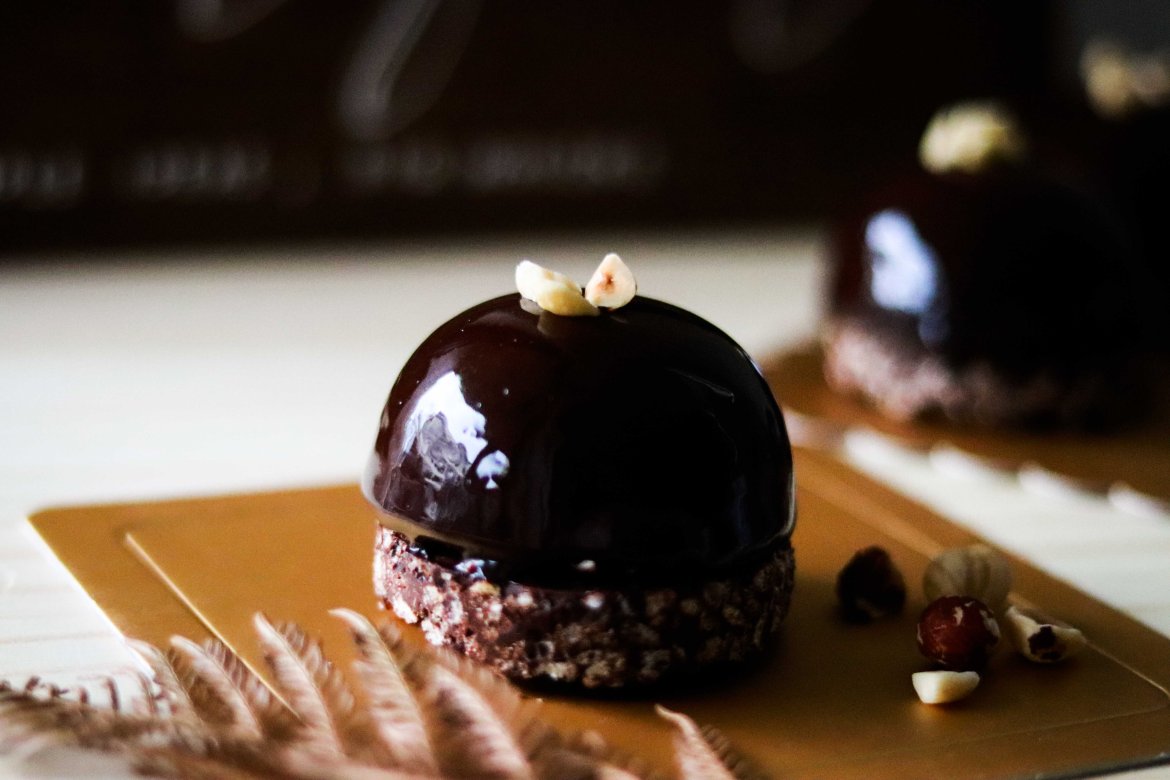
As I said, this dessert is celebratory, so I decided to apply some of the skills I learnt from school to it. It is also inspired by the Shiny Mirror Glaze Mousse Dome with Crispy Chocolate Base and Ganache Topping created by Cupcake Savvy’s Kitchen. Cutting through the sphere, you get a smooth French hazelnut chocolate mousse, creamy coffee creme patissiere, and a layer of refreshing poached pear that balances the richness & sweetness of chocolate. The dessert’s crunchy texture is provided by a crispy rice puff chocolate base (who doesn’t like indulging him/herself in loads of cocoa rice puffs???), and I finished it off with a shiny chocolate mirror glaze that renders the dessert a sophisticated look. How does that not sound heavenly?

hazelnut_mousse_sphere_with_mirror_glaze3

Special thanks to my friend who made me this stunning board with my baking motto – Simple Ideas, Big Whisks – written on it. <3 hazelnut_mousse_sphere_with_mirror_glaze10

hazelnut_mousse_sphere_with_mirror_glaze5

Realistically speaking, baking at home can be a bit tricky at times because you don’t always get the equipment or tools you need for your recipe. Like this time, I didn’t have a smaller sphere mold for my coffee creme patissiere so I had to carefully spoon it into the large mold, which could create a bit of a problem in terms of even layerings. But well, as as a pastry chef wanna-be, I need to be adaptive and make use of what I’ve got at home. Although the end result isn’t as perfect as I wanted, I am already quite happy with it. Anyway, give this recipe a go – If you are a hard-core chocolate fans, I think you will fall in love with it. Have a good weekend!

Ingredients:

Hazelnut Dark Chocolate Mousse

  • 150g dark chocolate
  • 50g butter
  • 3 egg yolks
  • 3 egg whites
  • 35 caster sugar
  • 25g nutella

Coffee Creme Patissiere (coffee pastry cream)

  • 150g milk + 1 tsp instant coffee powder
  • 1 tsp vanilla
  • 1 tbsp coffee liqueur
  • 25g egg yolk
  • 25g caster sugar
  • 10g corn flour
  • 10g butter

White Wine Poached Pear

  • 2 fresh pear, cored
  • 300ml white wine
  • 300ml water
  • 60g caster sugar
  • 1/2 tsp vanilla
  • 1/2 orange, zest of
  • 1/2 cinnamon stick

Crispy Chocolate Base

  • 200g dark chocolate
  • 100g choco rice puff

Chocolate Mirror Glaze

  • 100g sugar
  • 35g cocoa powder
  • 40g water
  • 70g double cream
  • 1 1/2 tsp gelatin
  • 1 1/2 tbsp water

Instructions:

Hazelnut Dark Chocolate Mousse

  1. Using a double boiler, melt the chocolate on low heat until melted. Let it cool slightly. Stir in butter and nutella. Set aside.
  2. Using a whisk, lightly beat egg yolks until pale and creamy. Add to the chocolate mixture, mix well.
  3. Using an electric mixer, beat egg white until foamy. Gradually add sugar and beat egg white to stiff peaks.
  4. Gently stir in the chocolate-egg yolk mixture (in three additions) into the egg whites, mix until no obvious egg white is visible.  
  5. Refrigerate until ready to use.

Coffee Creme Patissiere (coffee pastry cream)

  1. Using a saucepan, heat milk and instant coffee powder over medium heat and bring it to boil.
  2. While the milk is being heated, add egg yolk, sifted corn flour, caster sugar in a bowl. Mix well with a whisk until you can a thick, creamy consistency.
  3. With a steady mixing motion, pour 1/3 of the milk mixture to the egg mix to temper the egg.
  4. Pour the above mixture into the saucepan and cook over medium heat while whisking vigorously for at least 3 mins, until all starch is cooked. You will know it’s almost ready when it starts to bubble. Continue cooking for 1-2 mins. Remove it from the heat.
  5. Whisk in the butter and coffee liqueur until incorporated.
  6. Pour the custard into a bowl and cover the custard surface with a plastic wrap. This will prevent a skin from forming on top.
  7. Let the custard cool to room temperature. Refrigerate until ready to use.

White Wine Poached Pear

  1. Put all ingredients (except the pears) in a pan.
  2. Peel and core pears, gently poach (NOT boil) pears in syrup.
  3. Cook the pears for about 1 hour until they are soft. Use a stick to test every once in a while to see if the pears are done.
  4. When done, take out the pears from the pan to stop the cooking process.
  5. Cut one poached pear into small cubes, and blend the another one into puree or mash it with a fork. Pour the pear cubes into the puree and mix well. Refrigerate until ready for use.

Crispy Chocolate Base

  1. Using a double boiler, melt chocolate on low heat until melted. Pour the chocolate onto the rice puff and shape the mixture into a 2-cm thick layer.
  2. Refrigerate for at least 30 mins, and use a circular cutter that fits the size of the spheres to cut 6 circular bases. Refrigerate until ready to use. (If the base is too hard to cut through, run the cutter in a hot water bath and dry it before usage.)

Chocolate Mirror Glaze

  1. Add gelatin and cold water into a bowl. Stir and set aside until ready to use.
  2. In a saucepan, add sugar, cocoa powder, water and cream. Mix well with a whisk.
  3. Over medium heat, bring the mixture to boil while stirring continuously. Cook for about 2 mins until the mixture is smooth and no lump is visible.
  4. Turn off the heat, add the gelatin mix and stir well.
  5. Set aside and let cool to at least 35 C for usage.

Assembly

  1. Put the hazelnut chocolate mousse into the mold. Smoothen out the surface with a spoon until you can an even layer as the outer layer of the sphere. Freeze for 15 mins.
  2. Then, put the coffee creme patissiere in the mold. Freeze for 15 mins.
  3. Then, pour the pear mixture into the mold. Leave some space for the next step of closing the sphere with the hazelnut chocolate mousse. Freeze for 15 mins.
  4. Then, close all the spheres with a thin layer of the hazelnut chocolate mousse. Smoothen the surface with a off-set spatula. Freeze for at least 3 hours or preferably overnight to let it set completely.
  5. Carefully push the spheres out of the mold and put them on to a cooling rack. Pour the mirror glaze (at 35 C). Set it set. And put the glazed sphere on to the circular chocolate base.
  6. Sprinkle some chopped hazelnut on top as decorations.

Yum


8 comments
Zuger Kirschtorte with a raspberry twist (with review of the 1st week of final practical assessment @LCB)


Hello again, I’m quite excited about this post because I just had my first practical assessment week and I could do a little review (YAYY!!). One major part of this week’s assessment is making French puff pastry, which was needed to make vol-au-vent, bouchee, and palmier. Learning to make puff pastry myself was quite a journey; yes, it is a long and technical process but hey, it’s actually very fun and rewarding when you see the result. Although I still panicked everytime I used the dough sheeter ( the chance of dropping the pastry on the ground is so high, well at least for me, if you don’t pay enough attention), I successfully produced puff pastry products that rose beautifully and were flaky and buttery :). Sorry that I didn’t take any pictures of them as I was too preoccupied that day.

Other assessment items for the week include linzer torte, baklava, coffee eclairs and fruit flan. I didn’t get to practise on linzer torte because I got sick last week; luckily, it was a rather straightforward dessert with an elegant look. Also, we had to make baklava, a rich buttery dessert made of layers of filo pastry filled with grinded nuts soaked with syrup. I wasn’t a big fan of baklava as I found it too heavy when I first tasted it a few weeks back then, but I realised that it tasted so much better when served cool/cold.

Linzer Torte

Zuger Kirsch Torte (with raspberry twist) 3

Zuger Kirsch Torte (with raspberry twist) 6

Coffee eclairs and fruit flan were the last assessment items for this week. As we did a lot of mise en place the day before (i.e. pastry cream and sweet pastry dough), it was the most relaxing day among all. When I made my eclairs yesterday, my choux pastry got too liquidy as I added too much egg. So I had to quickly make another choux pastry without falling behind my schedule too much. Luckily I got back on track and got to finish and present my items on time. What a relief!

IMG_4279IMG_4276

At this point, you may wonder what we will be mainly making for our final assessment next monday. It’s Zuger Kirschtorte. Zuger Kirschtorte is a traditional layer cake from Switzerland with layered with japonaise (almond-meringue),  kirschwasser flavoured génoise  sponge, and buttercream. Normally, the outer layer of the cake is coated with flaked almond as well. I absolutely love this cake because of its intricate complexity – it is layered with various elements working together to create beautiful textures and flavour combinations.

Zuger Kirsch Torte (with raspberry twist) 5

For the recipe I am sharing here*, it holds the essence of the cake with a raspberry twist. I decided to incorporate raspberry to the cake for three reasons. Firstly, the buttercream has to be pink for the final assessment, maybe for aesthetic reasons (?), so I reckon raspberry would be a good choice to fit the color. Secondly, the tangy and sweet flavours of raspberry would complement the richness of buttercream perfectly. Thirdly, they look so damn good as decoration no? This cake is perfect for celebration, especially when it’s in this ridiculously adorable pink color haha. Finger crossed that I can successfully finish making this cake next monday! Enjoy the weekend 🙂

*Recipe and Instructions given are adapted from those provided by Le Cordon Bleu.Zuger Kirsch Torte (with raspberry twist) 2

Zuger Kirsch Torte (with raspberry twist) 4Zuger Kirsch Torte (with raspberry twist) 1

Génoise  sponge

Ingredients:


  • 100g whole eggs, room temperature
  • 65g caster sugar
  • 1/2 tsp vanilla essence
  • 65g plain flour
  • 20g melted butter


Instructions:


  1. Preheat oven at 190C.
  2. Grease and line a 6 inch pan.
  3. Using an electric mixter, mix eggs, vanilla, and sugar on medium speed until thick and pale (or ribbon stage is reached).
  4. Fold in sifted flour and melted butter alternatively. Gently mix until no flour is visible.
  5. Pour batter into the prepared cake pan.
  6. Bake at 190C for 15-18 mins until golden brown, or when a skewer inserted into the cake’s centre comes out clean. Let cool and unmold the cake. Cut a slice of the cake (around 2 cm thick) with a serrated knife; set aside.


Japonaise

Ingredients:


  • 95g egg whites
  • 60g caster sugar
  • pinch of cream of tar tar
  • 20g corn flour, sifted
  • 95g ground almond
  • 70g caster sugar


Instructions:


  1. Preheat oven at 170C.
  2. Using an electric mixer (make sure the whisk and bowl are oil-free), beat egg whites and cream of tar tar on high speed until stiff. Gradually add in sugar and mix for another 2 mins.
  3. Mix corn flour, ground almond, and caster sugar in a bowl. These are your dry ingredients; set aside.
  4. Fold in half of the egg white mix to the dry ingredients. Mix gently.
  5. Add the remaining egg white mix and gently blend until just incorporated. Important: be as gentle as you can in this step. Don’t overmix to avoid the mixture from becoming too thin.Put the batter into a piping bag with a plain round nozzle. Pipe two 6 inch discs onto silicone paper.
  6. Bake at 170C for 20-25 mins until golden brown.


Kirsch syrup

Ingredients:


  • 50g caster sugar
  • 50g water
  • 30ml kirsch


Instructions:


  1. Bring the sugar and water to the boil.
  2. When cooled, add the Kirsch.


Raspberry vanilla italian buttercream

Ingredients:


  • 160g caster sugar
  • 40ml water
  • 100g egg white
  • 250g unsalted butter, room temperature and chopped to small cubes
  • 1/2 tsp vanilla essence
  • 3 tbsp raspberry jam
  • few drops of red food coloring


Instructions:


  • In a medium pot, boil sugar and water.
  • When syrup reaches 110 C, start whisking egg whites with an electic mixer on high speed.
  • When syrup reaches 118C, add syrup in a fast stream (be careful with the hot syrup!) to the egg whites. Continue whisking until the mixture is light and cooled to room temperature.
  • Add butter to the italian meringue piece by piece. Add raspberry jam. Continue mixing until no butter cubes are visible, and the buttercream is smooth and creamy.
  • Set aside for frosting.


Homemade raspberry jam (can substitute store-bought jam):

Ingredients:


  • 125g fresh raspberry
  • 125g sugar
  • 1 tbsp lemon juice


Instructions:


  • Bring sugar and raspberries in a saucepan on high heat for around 2 mins until all sugar has dissolved. Mash raspberries with a fork as you go.
  • Turn to medium heat, continue to cook the jam until it’s thickened enough to your liking.
  • Turn off heat. Add lemon juice and mix well.
  • Transfer the jam into airtight jar for later use.


Assembly

  • Assemble gateau using two discs of japonaise sandwiched with raspberry jam, buttercream and Genoise sponge soaked with kirsch syrup.

In other words,


  1. Firstly put a disc of japonaise as the cake base.
  2. Then, pipe 1 cm thick of italian buttercream. Spread raspberry jam on top of italian buttercream.
  3. Add the sponge cake. Generously brush the kirsch syrup onto the sponge cake until it’s well soaked.
  4. Repeat step 2.
  5. Put the 2nd disc of japonaise on top of the sponge cake.
  6. Frost the cake with italian buttercream and decorate it with garnishes to your liking.


Choice of garnish


  • Flaked almond
  • Fresh raspberry
  • Chopped roasted pistachios


 Yum


6 comments
Drunk in Style – White Wine Poached Pear Almond Tart


It’s been a while, everyone. I am really glad that I’m finally sharing a recipe I learnt from school with you all. This week, our teacher demonstrated how to make this French-style white wine poached pear almond tart (Pear Bourdaloue); I absolutely loved it and I knew I had to recreate it for myself.

White-wine-poached-pear-almond-tart4

Making tarts hasn’t been my strong suit, because up until now I haven’t fully grasped the techniques of handling and rolling pastry. Thanks to school, I had to squarely deal with all my weaknesses and practice. Cope with the huge difference between last year’s baking experience and that of this year isn’t easy either. In LCB, I am constantly introduced all sorts of pastry items that never existed in my world due to my limited exposure to the culinary world. Honestly, the feelings of inadequacy could be overpowering at times, but so is the sense of excitement burning in my heart that I know I just have to keep learning and getting better. For those who are curious about what I’ve made at school for the past few weeks, I’ve attached couple photos at the end of this post as promised. 

White-wine-poached-pear-almond-tart2

About the tart itself, I know in many sense it matches with autumn theme more, but when you want to eat tarts who cares about the time? Sweet and soft pears shall be the star of this tart – they are beautifully spiced by cinnamon and cloves, with the addition of tangy, sweet flavour thanks to the white wine, as well as lemon and orange peel. Poaching pears requires correct time, temperature and patience. You want soft, sweet, flavoured pears that are not cooked to become mushy in the end. Having the pears together wIth the nutty almond cream at the bottom is simply delicious. I like having this tart when freshly baked (preferably with vanilla ice-cream on top, yummmm), but it’s purely my own preferences. I hope you will enjoy this recipe! 

White-wine-poached-pear-almond-tart

White Wine Poached Pear (Can be made the night before)

Ingredients:

  • 6 fresh pears
  • 500ml water
  • 500ml white wine
  • 250g sugar
  • peel of 1 lemon
  • peel of 1 orange
  • 1 cinnamon stick (or  1 tsp ground cinnamon)
  • 1 clove (or ⅛ tsp ground cloves)

Instructions:

  1. Put all ingredients (except the pears) in a pan.
  2. Peel and core pears, gently poach (NOT boil) pears in syrup.
  3. Cook the pears for about 1 hour until they are soft. Use a stick to test every once in a while to see if the pears are done.
  4. When done, take out the pears from the pan to stop the cooking process. Reserve the liquid. When both the pears and liquid have cooled, let the pears continue soaking in the liquid. Keep in fridge until ready to use.

Sweet Pastry Dough (this recipe makes two tart shells):

Ingredients:

  • 225g unsalted butter
  • 142g sugar
  • 90g eggs (room temperature)
  • 1 tsp vanilla essence
  • 375g bakers flour
  • Pinch of salt
  • 45g almond meal

Instructions:

  1. Cream butter and sugar by hand or with a mixer until well combined.
  2. Adds eggs (one at a time) and vanilla. Mix.
  3. Mix in sifted flour and almond meal to form a dough.
  4. Wrap it with plastic and keep in refrigerator to set and rest for at least 30 mins. (the gluten in the dough needs to rest or the pastry will shrink when baked)
  5. Preheat your oven to 180C.
  6. Lightly flour your working surface. Roll out the pastry to 2.5-3mm thickness. Line a 8 inch tart pan with sweet pastry. Poke littles holes with a folk on the pastry’s base to avoid air bubbles from forming when the pastry is baked. Refrigerate to rest the pastry for 20 mins.
  7. Bake the pastry for 12-15 mins until golden brown.
  8. Let cool and set aside.

Almond cream

Ingredients:

  • 120g caster sugar
  • 120g butter
  • 1 tsp vanilla essence
  • 2 eggs (room temperature)
  • 20g baker flour
  • 120g almond meal
  • 20ml rum (optional)

Instructions:

  1. Cream butter and sugar by hand of a mixer until well combined.
  2. Add vanilla, and eggs (one at a time). Mix well.
  3. Add flour, almond meal, and rum (if used). Mix well to form a paste.
  4. Set aside until ready to use.

Assembly

  1. Preheat the oven to 180C.
  2. Fill the tart with the almond cream generously.
  3. Put the poached pears on top according to the design you want.
  4. Bake for approximately 25-35 mins until golden brown.
  5. Sprinkled toasted almond on top if desired.

IMG_3165IMG_3167IMG_3157IMG_3330IMG_3505IMG_3703IMG_3732IMG_3840IMG_3845

Yum


5 comments
C for Celebrate – Flourless Mocha Pistachio Cookies


Christmas is just around the corner, and it means BAKERS GOTTA BAKE. Therefore, the upcoming posts are going to be Christmas-themed. These flourless Pistachio Chocolate Cookies are possibly the easiest baked goods that you can give to bribe your friends and family *smirk* . They cannot be simpler to make. Also, there’s something about pistachio that makes these cookies look extra festive. The pistachio crumbs are like sparkles; just a small amount of them already gives the cookies a vibrant character and another layer of luxury.

flourless_mocha_pistachio_cookiesflourless_mocha_pistachio_cookies3

I made these cookies for a party with a newly met friend who’s also crazy about baking (we literally forgot to have lunch that entire afternoon). She’s very passionate about vegan baking and feel free to check her works out here . I am not sure if you can relate, but It felt amazing to me to work with another baker in my kitchen; when we baked, we understood each other’s mind pretty well and fast that things were finished in no time. Looking back, I realise how many precious friendships have developed and been improved due to my fervour for baking and food in general. How funny things work huh?

flourless_mocha_pistachio_cookies7

Back to the star of this post. This recipe is adapted from the chocolate crinkle cookies by Anna Olson.  As always, I decreased the cookies’ sweetness to suit the taste of my friends and family. And I also added coffee and coffee liqueur as the favour booster. In my opinion, these cookies taste best when freshly taken out from the oven, as the chocolate would literally melt in your mouth. However, if you intend to pack them nicely for others, it’s alright, because when they’re cooled, they’d simply turn to some fudge-like cookies that are equally addictive. Make these cookies. Make people around you happy.

: )

flourless_mocha_pistachio_cookies4

Ingredients:

Make 24 cookies (around 25g per cookie)

  • 270 g 70% dark chocolate, melted
  • 2 whole eggs + one egg yolk at room temperature
  • 30g granulated sugar
  • 1 tsp coffee liqueur (or vanilla extract)  
  • 2 tbsp instant coffee powder, ground, melted in 2 tbsp hot water
  • 2 tbsp milk
  • 1 cup (130 g) icing sugar, plus extra for rolling cookies
  • ½ cup (60 g) cocoa powder
  • 1 Tbsp (7 g) cornstarch
  • ½ tsp (2.5 g) salt
  • 50g pistachio, chopped

Instructions:

(adapted from https://www.youtube.com/watch?v=UJmewcEnlJY):

Baking directions:
1. Preheat the oven to 375 ºF (190 ºC). Line 2 baking trays with parchment paper.

2. Melt the chocolate in a metal bowl placed over a saucepan filled with an inch of barely simmering water, stirring gently until melted. Set aside.

3. With electric beaters or in a stand mixer fitted with the whip attachment, whip the eggs with the granulated sugar, coffee liqueur, coffee mixture and milk  until frothy and light, about 3 minutes (it doesn’t have to hold a “ribbon”). Whisk in the melted chocolate.

4. Sift in the icing sugar, cocoa powder, cornstarch and salt and stir in by hand until well combined. The batter may seem very soft at first, but just give it a minute – it will tighten up.

5. Place some icing sugar in a shallow dish. Use a small ice cream scoop to scoop the batter and drop it directly into the icing sugar (I measured each cookie as 25g and it’s a good size), rolling to coat each scoop fully. Arrange these on the prepared baking trays, leaving 1 ½-inches (4 cm) between them. Gently press each cookie flat with the palm of your hand. Press pistachio crumbs onto the cookies. Bake the cookies for 10 minutes (do not overbake) and cool the cookies on the tray just until they can be lifted off (1-2 minutes) then cool on a rack.

Yum


0 comment
The Cool Beans – Tiramisu Macaron with Coffee Mascarpone Buttercream Filling


I’ve waited SO LONG to have this post about THE intimidating macarons. I don’t know about you, despite how lush and tempting macarons Look, I often find them too pricey to bring home as a student. So, I might as well learn to make them myself, right?   

tiramisu-macaron-with-coffee-mascarpone-buttercream-filling8

tiramisu-macaron-with-coffee-mascarpone-buttercream-fillingtiramisu-macaron-with-coffee-mascarpone-buttercream-filling4

It’s no exaggeration to say that these tiramisu macarons are heavenly. Tell me, how can you resist it when you get a crispy coffee-flavoured almond meringue shell with a marshmallow interior, with some creamy rich and creamy mascarpone cheese buttercream layered between? The bitterness from the coffee justly tones down the macarons’ high level of sweetness that’d be considered a put off for certain people.  Have a bite and you’d be brought straight to Paris.

tiramisu-macaron-with-coffee-mascarpone-buttercream-filling6

I am quite a perfectionist when it comes to baking. This is a double-edged sword, because while it always pushes me to strive for the best result, sometimes I could just break down for a not-so-good-looking muffin. However, ironically,  here I am, ready to talk about the making of macarons –  something that constantly forces me to deal with imperfection.  Sometimes I’d pipe out macarons that aren’t the same shape and size on the baking sheet; sometimes the macaroon shells would crack when I was eagerly peeping through the oven door; sometimes the famous and essential “feet” simply wouldn’t show.  In other words, there are  tons of reasons for me to face frustration when making these little treats, or for me to doubt myself. But there’s one thing that I know for sure –  to master anything I have to start somewhere, and coming to terms with initial failures is the way to go because that’s how I figure out what’s wrong and how to fix it.

tiramisu-macaron-with-coffee-mascarpone-buttercream-filling2tiramisu-macaron-with-coffee-mascarpone-buttercream-filling3

If I have to mention the most important thing that I have learnt about making macarons, it’d be it is not as hard as it seems, yet it has to be made with absolute precision. In order to create the smooth top shell layers and the little famous “feet”, you must rest the macaron for at least 30 mins before baking, and make sure the oven is kept at low temperature (i.e. 150C). Also, as many would agree, when compared with the traditional French meringue method, using the Italian meringue method produces more stable result. If you feel uncertain about reading the written instructions alone, do check out some tutorial videos with clear demonstration online (The Scran Line is  good source where you’d find lots of creative macarons recipes). I hope you will try it out for yourself! 😉

Ingredients:

Yields about 20 Macaroons (40 shells)

  • 100 g ground almonds
  • 100 g icing sugar
  • 100 g caster sugar
  • 80 g egg white, separated into two portions, 40g each 
  • 32.5 ml water 
  • 2 tsp instant coffee, melted in 1 tsp water

Filling:

  • 100 g softened butter
  • 100g mascarpone cheese
  • 50g icing sugar
  • 1 tsp (5ml) coffee liqueur

Instructions :

Macaron shells:

  1. Place the icing sugar and almond flour in a food processor, and pulse for 30 seconds until well combined and fine in texture. Sift the flour-sugar mixture through a sieve into a mixing bowl, and pour in the first portion of egg whites. With a spatula, mix together until well combined. You can still be quite vigorous at this stage.
  2. Now you prepare the syrup. Put sugar and water in a small saucepan and do NOT stir. Bring the water and sugar to boil at 118C. When the syrup reaches 115C, simultaneously start whisking the second portion of egg whites to soft peaks on a medium speed.
  3. When the sugar reaches 118C, pour it over the egg whites (pour the hot syrup on the side of the mixing bowl to avoid cooking the egg whites). Turn the mixer to high speed and continue beating for about 5-7 mins, until the meringue is cooled down to 50C and glossy stiff peaks have formed. In two additions, add the meringue over the almond mixture, and, using a spatula, gently fold in until combined and smooth. Work the batter until it flows in very thick ribbons when the spatula is lifted.
  4. Pipe rounds of batter about 3.5cm in diameter, spacing them 2cm apart on baking trays lined with baking parchment. Rap the baking sheet a few times firmly on the counter to flatten the macarons and to remove air bubbles.
  5. Tap the tray on the work surface covered with a kitchen cloth. Leave to stand for at least 30 minutes, until a skin forms on the shells.
  6. Preheat the oven to 150C, then put the trays in the oven. Bake for 15 minutes. Out of the oven, slide the shells on to the work surface. Let cool.

Coffee mascarpone buttercream filling:

  1. Add softened butter and mascarpone cheese to a mixing bowl. Using an electric mixer, beat on a medium speed until smooth.
  2. Add icing sugar and coffee liqueur, continue beating for an extra minute until combined and smooth.
  3. Refrigerate until ready to use.

Assemble:


  1. Place the mascarpone buttercream filling into a piping bag topped with a rose nozzle and pipe it on the inside of the macarons and sandwich them together.
  2. Serve macarons at room temperature, or refrigerate for up to a week.

Yum


4 comments
Sunflower Love – Japanese Mini Cheese Tart with Milo Crust


Good news – there are finally some good tarts made in Charlotte’s kitchen!! I haven’t updated the blog for nearly two weeks, because 1) life outside was so eventful that my kitchen lost its allure to me temporarily (trust me it’s really big thing for someone like me who always prefers to stay home) and 2) I had been trying to figure out the best method of making these little japanese cheese tarts so that I can share this recipe with you guys.

Japenese-mini-cheese-tart-with-milo-crust

If you are a fan of Japanese desserts, cheese tart shouldn’t sound unfamiliar to you. People are crazy about it, but who can blame them? Taste wise, the tart marries sweet and salty brilliantly. Texture wise, the contrast between the buttery crispy crust and the lava-like cheesy filling probably creates the most unforgettable tart eating experience. I once tried it in Japan, and I simply couldn’t get over it ever since.

Japenese-mini-cheese-tart-with-milo-crust2

Japenese-mini-cheese-tart-with-milo-crust4

My take on this tart overall is pretty straightforward, except that I added some milo powder into the crust for a little malty, chocolate twist. If you follow the instructions carefully, making the tart filling shouldn’t be hard either – it basically resembles making custard with the use of a double boiler, so that things can be cooked evenly and gently without cooking the egg. The cornflour and egg will thicken the mixture considerably so that you can easily brush egg yolk on it before baking.

Japenese-mini-cheese-tart-with-milo-crust3

One thing I must remind you here is, that no matter how eager you want to see the result, please be patient to let tart crusts cool and dry up before filling them up. I was impatient before and the tart ended up tragically soggy (yeah you don’t want that). Thanks for reading and I hope you will make them soon!

Japenese-mini-cheese-tart-with-milo-crust6Japenese-mini-cheese-tart-with-milo-crust8

Make 10-12 mini tart

For the Crust:

  • 1 1/2 cup (188g) all purpose flour (+ 2 tbsp for kneading)
  • 25g milo powder
  • 1/2 cup (115g) cold butter, cut into small cubes  
  • 1/4 cup (50g) caster sugar
  • 1 egg
  • salt

For the filling:

  • 110g cream cheese
  • 110g mascarpone cheese
  • 2 tbsp (28g) butter
  • 1/2 cup (120 ml) whole milk or heavy cream
  • 50g icing sugar (sifted)
  • 1 egg
  • 12g cornstarch (corn flour) (sifted)
  • 1 tbsp lemon juice
  • 1 tsp vanilla extract

Extra egg yolk for brushing

Instructions:

For the filling:

  1. Using a double boiler, heat and melt cream cheese, mascarpone cheese, butter until smooth.
  2. Add sifted cornflour and icing sugar, and mix well.
  3. Add egg, and mix well.
  4. Stir in milk, lemon juice, and vanilla, and mix well.
  5. Let the custard cool for at least 15 mins before putting them into a piping bag tipped with a round nozzle. Chill it in the refrigerator for later use.

For the crust:

  1. Blend together flour, milo powder, sugar, salt, butter with a pastry cutter or a food processor, until the mixture becomes coarse meal with spea-size butter lumps.
  2. Add egg and vanilla, and stir until incorporated.  
  3. Put the mixture onto a lightly floured surface. Add the extra 2 tbsp flour onto the dough surface. Knead the dough for a few times until the dough is brought together and no longer sticky. Press it into a ball, then flatten into a disk. Wrap it with plastic wrap and refrigerate for at least 30 mins until firm.
  4. Roll out dough into 3-4mm thick with a rolling pin on a lightly floured surface and fit into tart pans. Prick bottom and sides with a fork. Refrigerate for 30 minutes.
  5. Now, Preheat your oven to 375F/190C.
  6. Bake tart shell for 15-18 mins . Let them cool in the pan until they’re cool enough to handle. Take the shells out of the pan and let them cool completely on a wrack.
  7. Now turn up the heat of your oven to 446F/230C.

Assemble:

  1. Pipe custard into the cooled tart shells, brush egg yolk on the surface.
  2. Bake for 6 mins on the top shelf (to facilitate browning). If you prefer a runnier texture, try 4 or 5 mins. Enjoy!

Yum

1 comment
Because Why Not – Peanut Butter and Strawberry Jam Cake with Peanut Butter Swiss Buttercream Frosting


This joyful looking cake came into existence for two reasons. First, apparently I loved making chocolate desserts too much and I must stay away from it (right?). Second, it doesn’t hurt to go for some classic sometimes. By classic, I mean the marriage of salty and sweet – Peanut Butter & Jelly – made famous by Americans. Of course, this combination shouldn’t be limited to a breakfast/snack sandwich; think about it, if it works brilliantly between two slices of bread, it surely can make a great cake too.

Peanut-butter-and-jelly-cake-with-peanut-butter-swiss-buttercream-frosting


Peanut-butter-and-jelly-cake-with-peanut-butter-swiss-buttercream-frosting6Peanut-butter-and-jelly-cake-with-peanut-butter-swiss-buttercream-frosting2

I originally designed this layer cake for my friend’s birthday, and this is a new recipe modified mainly to improve the cake’s texture. My first PB&J cake was bit on the dry and tough side. Therefore, in my second attempt, I put in more eggs and oil, and I also decided to fold meringue into the cake batter at last instead of incorporating whole eggs. Such changes increased the volume of the cake with richer taste and finer structure.

Peanut-butter-and-jelly-cake-with-peanut-butter-swiss-buttercream-frosting5

One indispensable component of this cake is the jam. The slightly tart strawberry jam with a citrus touch perfectly undercuts the richness of the buttercream. People who have been in my baking life would know that I always prefer making things from scratch, for I want to have great control of my baked goods (here comes the even greater satisfaction afterwards!). I couldn’t resist making my own strawberry jam for the cake (see note for instructions), but again, you can by all means purchase your favourite jam :). Enjoy!

Peanut-butter-and-jelly-cake-with-peanut-butter-swiss-buttercream-frosting7

Peanut-butter-and-jelly-cake-with-peanut-butter-swiss-buttercream-frosting4

Ingredients:

(make one 6-inch cake)

For the Cake:

  • 1 ½ cup (188g) cake flour
  • 1 tsp baking powder
  • ¼ tsp baking soda
  • ¼ tsp cinnamon
  • Pinch of salt
  • ¼ cup (58g) unsalted butter, softened
  • 2 tbsp (30ml) vegetable oil
  • 1/4 cup (60ml) crunchy peanut butter
  • ⅓ cup (75g) granulated sugar
  • 2 egg yolks
  • 2 egg whites + 25g icing sugar
  • 1 tsp vanilla extract

For the Peanut Butter Swiss Buttercream Frosting:

  • ¾ cup (150g) white granulated sugar
  • 5 egg whites
  • 1/4 tsp cream of tar tar
  • 1 ½ ( (345g) cups unsalted butter, softened  
  • 1 teaspoon vanilla extract
  • 1/4 cup (60ml) creamy peanut butter

For the homemade strawberry jam (or ½ cup store bought jam)

  • 250g  strawberries
  • 4 tbsp white sugar
  • 1/2 lemon, juice and zest of

Toppings:

  • Fresh strawberry slices
  • Extra peanut butter swiss buttercream

Instructions:

For the cake:

  1. Preheat the oven to 350F (175C)
  2. Line one 6 inch cake with parchment paper. Set aside.
  3. In a mixing bowl, thoroughly sift in and combine flour, baking powder, baking soda, cinnamon and salt.
  4. In another mixing bowl (make sure it’s oil free), add egg whites, icing sugar and cream of tar tar. Using an electric beater, beat on high speed until soft peak forms. Transfer the meringue into another bowl; set aside.  
  5. Using the same mixing bowl you used to make the meringue, beat butter and sugar at medium-high speed for 4-5 mins until pale and fluffy. Add oil and continue beating for 2 min until incorporated.
  6. Add eggs yolks, one at a time, peanut butter and vanilla. Continue to beat at medium speed until well combined.
  7. Add the prepared dry ingredients into the mixture in three batches. Mix on low speed until no flour can be seen.
  8. Finally, gently fold the prepared meringue into the cake batter with a spatula. Mix gently with folding motion until just incorporated.
  9. Pour the mixture evenly into the prepared cake tin. Tap the pans several times to break any air bubbles. Bake for 50 mins, or until a toothpick inserted in the cake’s centre comes out clean.
  10. Cool the cake for 30 minutes in their pans, then take them out and put them onto a cooling rack to cool completely.
  11. While the cakes are cooling, prepare the peanut butter swiss buttercream.

For the Peanut butter Swiss Buttercream:

  1. Add  egg whites and sugar to an oil-free bowl. Using a double boiling method, gently heat the egg whites mixture up, while whisking constantly, until temperature reaches 140F (60C).  The sugar should have completely dissolved at this stage.
  2. Add the hot egg white-sugar mixture to your electric mixer mixing bowl (oil-free). Whip on high speed until the meringue is thick and glossy, and the bottom of the bowl feels cool. This will take about 7-10 mins.
  3. Turn to medium-low speed, gradually add the softened butter cubes, one at a time, until incorporated. Continue beating until a silky smooth texture is reached. Add vanilla and peanut butter, and beat until well combined.
  4. Pipe the buttercream onto the cupcakes with a round tip for later use.

Assembly:

  1. Level the cake layers by slicing the top curve of the cakes with a sharp knife to achieve a flat surface.
  2. Cut the cake into three even layers.
  3. Peel the parchment paper from the base of the cake layers and place one layer onto a plate or a cake board placed on a revolving cake stand (if you have it).
  4. Now we do the crumb coat first.
  5. Pipe a generous amount of frosting evenly on the cake layer. Using an offset spatula, spread the frosting carefully and top it a thin layer of strawberry jam.
  6. Top it with the second cake layer and repeat step 5, and top it with the third cake layer.
  7. Frosting the top and sides of the cakes. Get a nice, smooth coat of icing with a bench scraper or a spatula.
  8. Put the crumb-coated cake in the refrigerator for an hour to get the frosting nice and firm. Once the cake is chilled, frost your cake evenly with another layer of frosting using the same method. Get rid of all the peaks and blemishes in the process.
  9. Pipe dollops of cream onto the cake, put thin strawberry slices and spinkle cocoa powder as garnish if desired.
  10. Refrigerate the cake for at least 1 hour.

Note:
Instructions for the homemade strawberry jam: 

  1. Prepare the strawberries by washing them and drying them with a kitchen towel. Remove their stems. Crush strawberries in batches or cut them into small cubes.
  2. In a heavy bottomed saucepan, mix together the strawberries, sugar, and lemon juice. Stir over low heat until the sugar is dissolved. Increase heat to high, and bring the mixture to a full rolling boil. Boil for 5-10 mins until the jam has reached 105C, then turn off the heat.
  3. Let the jam cool to room temperature. Put the jam into jars and refrigerate until ready for use.

Yum


9 comments
Golden Haze – Ferrero Rocher Cupcake with Nutella Swiss Buttercream Frosting

Today let’s forget about going on (or thinking of going on – got you) diet, and just indulge ourselves in these golden goodness. These ferrero hazelnut cupcakes are simply perfect for celebratory occasions, because they’re

  • visually appealing
  • Sophisticated
  • indulgent

Ferrero_Rocher_Cupcake_with_Nutella_Swiss_Buttercream_Frosting

There’s a story behind this creation – my mum’s colleague tried my baked goods at work and asked me to prepare cupcakes for her wedding. As nervous as I usually am, I low-key panicked a little (okay actually A LOT) and have been wracking my brain to think about what I should make in order not to disappoint. Red Velvet? Carrot Cake? Oreo & Cream? As I started to get frustrated this idea suddenly popped up in my mind – thank God – and I decided to go along with it.

Ferrero_Rocher_Cupcake_with_Nutella_Swiss_Buttercream_Frosting3IMG_0916IMG_0925

Instead of conventional American buttercream, I opted for Swiss Buttercream for the cupcake frosting. Basically, making swiss buttercream requires an extra step of heating up egg whites and sugar in a double boiler, before you turn the egg white mixture into fluffy, glossy meringue. This method is highly sought-after, because 

1) it in general yields a more delicate & refined texture and taste
2) it does seem that the butter ratio in the frosting is significantly lowered

I followed the instructions given by Tessa on https://www.handletheheat.com/how-to-make-perfect-swiss-meringue-buttercream/with some minor adjustment. If you happen to encounter problems while making your swiss buttercream (it happens), do check this link out http://www.thebrewerandthebaker.com/archives/7640. It was a great help for me.

Ferrero_Rocher_Cupcake_with_Nutella_Swiss_Buttercream_Frosting2

IMG_0918

For the cupcakes themselves, I tried to incorporate some hazelnut elements into the cake batter, namely hazelnut meals and roasted hazelnut chocolate. And I’d be condemned if I dared to miss using the mighty hazelnut spread, Nutella, for my swiss buttercream, right? To complement the rich nutty flavours and to yield a refreshing and balanced final taste, I added a little bit tangy orange zest as well. I have to say, they brought so much more character and vibrancy to the cupcakes! Psss, If your greedy self wants to bring the cupcake’s luxuriousness to whole new level, edible gold paint is the way to go. Spread joy and love with these beautiful treats, people 😉

Ferrero_Rocher_Cupcake_with_Nutella_Swiss_Buttercream_Frosting7

Ingredients:

(make 15-16 cupcakes)

Cupcake: 

  • 1 ½  cup (188g) all purpose flour
  • 100g hazelnut meal
  • ¼  cup (25g) cocoa powder
  • 1 tsp baking powder
  • ¼ tsp salt
  • ½ cup (115g) butter, softened
  • 2 tbsp (30ml) vegetable oil ( I used canola oil)
  • ½ cup (113g) caster sugar
  • 2 large eggs, room temperature
  • ¼ cup (60ml) coffee, room temperature (2 tsp instant coffee powder melted in 1/4 cup (60ml) of water)
  • ½ cup (120ml) whole milk
  • 1 tsp (5ml) vanilla
  • 50g roasted hazelnut chocolate, melted (or you can use dark chocolate instead)
  • 1/2 orange, zest of

Nutella swiss buttercream:

  • 5 egg whites
  • 200g caster sugar
  • 280g chopped unsalted butter, soft
  • 50g Nutella
  • pinch of salt

Topping:

  • Unsweetened cocoa powder
  • Ferrero
  • toasted hazelnut, chopped

Instructions:

For the cupcake:

  1. Preheat oven to 350°F (175C) . Line pans with cupcake liners.
  2. In a mixing bowl, sift and combine flour, hazelnut meal, cocoa powder, baking powder, salt. Set aside.  
  3. In another mixing bowl, using an electric mixer, beat butter, oil, and sugar on medium high speed until creamy and smooth. This will take around 4-5 mins.
  4. Add eggs, one at a time, and continue beating for 1 min. Add coffee, milk and melted chocolate, vanilla, and cointreau. Continue beating for 30 secs.
  5. In 3 batches, pour the prepared dry ingredients into the mixture, and gently stir with a spatula until incorporated. Don’t overmix.
  6. Fill cupcake liners to nearly full and bake for 18-20 minutes, until a toothpick inserted in the cupcake’s centre comes out clean.

For the Nutella Swiss Buttercream:

  1. Add  egg whites and sugar to an oil-free bowl. Using a double boiling method, gently heat the egg whites mixture up, while whisking constantly, until temperature reaches 140F (60C).  The sugar should have completely dissolved at this stage.
  2. Add the hot egg white-sugar mixture to your electric mixer mixing bowl (oil-free). Whip on high speed until the meringue is thick and glossy, and the bottom of the bowl feels cool. This will take about 7-10 mins.
  3. Turn to medium-low speed, gradually add the softened butter cubes, one at a time, until incorporated. Continue beating until a silky smooth texture is reached. Add Nutella and salt, and beat until well combined.
  4. Pipe the buttercream onto the cupcakes with your favourite piping tip, and put a Ferrero Rocher, some chopped hazelnuts, and sprinkle sifted cocoa powder on top as decoration if desired.

Yum


5 comments
Coconut Rum Pecan Banana Bread

Present to you my beloved recipe of coconut rum pecan banana bread – a sneaky twist on a classic banana bread. This recipe results in a super moist, delicious banana bread that’s packed with coconut flavours, enhanced with a touch of rum aroma and a nutty crunch.

Coconut Rum Pecan Banana Bread

Do you guys have a favourite thing to make? People around me asked me that many times before and I usually couldn’t provide a definite answer. Yet, I guess there’s been an answer inside my heart all along – quick bread. Quick bread is any bread that can be made in a matter of minutes without necessarily using yeast in the process. In other words, they’re my kind of comfort food; quick and easy. It might be a bit embarrassing to say – at the earliest stage of my baking life, I didn’t have any baking tools except a loaf pan in my student dorm kitchen. To satisfy my hungry soul, what I did was keep exploring and trying out as many loaf recipes found online as possible. This crazy experiment resulted in many delicious loaves coming out of my oven (and inevitably some weight gain as well, but who cares? jk lol).

Coconut Rum Pecan Banana Bread

As you may already know, the key to amouth-watering banana bread is using OVERRIPE bananas. Yeap, if you don’t have them ready at home, you have to wait until all the banana skins have almost turned black and rotten. This is when the bananas have become mushy enough and, of course, the sweetest as most of the starch content is broken down into sugar. Trust me, it is totally worth the patience. Why wait? Provide your friends and family with the best banana experience by serving big slices of this banana bread as their breakfast or afternoon snack.

Coconut Rum Pecan Banana Bread

Coconut Rum Pecan Banana Bread

Ingredients:

  • 2 cups (240g) all-purpose flour
  • 1 tsp baking powder
  • ½  tsp salt
  • ½  tsp cinnamon
  • ½  cup (100g) dark brown sugar
  • ½  cup (115g) butter, softened
  • 2 large eggs, room temperature
  • 4 bananas, mashed
  • ¼  cup (60ml) coconut milk
  • 1 tbsp (15ml) rum
  • 50g & 1 extra tbsp (for sprinkling) shredded coconut  
  • 80g pecan, roughly chopped

Instructions:

  1. Preheat oven to 350F (175C). Line a loaf pan with parchment paper, or grease it with butter or oil; set aside.
  2. In a bowl, sift in and combine well the flour, cinnamon, baking powder, and salt.
  3. In another bowl, using an electric mixer, beat butter and sugar for 3 mins until fluffy.
  4. Add eggs, one at a time, and continue beating for 1 min.
  5. Add mashed bananas, coconut milk and rum, and continue beating until incorporated.
  6. Pour in the dry ingredients into the mixture in three batches, stirring continuously.
  7. Add in shredded coconut and pecans. Stir the batter gently with a spatula until everything is just incorporated.
  8. Pour the batter into the prepared loaf pan. Sprinkle some shredded coconut on top. Tap the pan several times to break any air bubbles. Bake the cake for 50-55 mins, or until a toothpick inserted in the cake’s centre comes out clean.
  9. Remove the cake from the oven and let it cool in the pan on a wire rack for at least 10 minutes. When the cake is cool enough to handle, remove it from the pan and let it continue to cool on the wire rack before making the glaze; this will take about 30 mins.
3 comments
Mint Chocolate Cupcake

Same as every other post, this starts with a declaration of love, and today it’s about my favourite dessert flavour combo – Mint Chocolate. I believe everyone has his/her own weakness in food choice; and no matter how hard I try to resist it, mint chocolate is beyond doubt mine. This is especially true when it comes to ice-cream flavour. Why? It is equal parts cool and sweet, and the best ones are so refreshing that they’d brighten up my day and clear my mind.

IMG_0786

Despite how mouthwatering and delicate they look, cupcakes are not something I’d usually order outside. Yet, as it’s one of my goals to try out as many kinds of desserts as possible on this blog of mine, I might as well give it a go, right? 

IMG_0787

From the base to the top of each cupcake, this recipe delivers great textural fun and flavour layering that I always strive for in baking. First, there’s an oreo biscuit added at the bottom as a nice, crunchy surprise. Thanks to the melted mint chocolate and coffee, the cupcake base is moist and rich, with just enough mint hit coming through. Finally, together with the mint-flavoured buttercream as well as the finishing touch of a cheeky little Andes mint chocolate chip, what you have here is a daydream literally packed with minty goodness. Hmm, too cool to be true. (:

IMG_0806

IMG_0801


Ingredients (make 18 cupcakes):

For the cupcakes:

  • 1 1/2  cup (188g) plain flour
  • 30g cocoa powder
  • 1 tsp baking powder
  • 1/4 tsp salt
  • 18 Oreo biscuits
  • 1/2 cup (115g) butter,  softened
  • 2 tbsp (30ml) vegetable oil ( I used canola oil)
  • 1/2 cup (113g) caster sugar
  • 2 large eggs, room temperature
  • 1/4 cup (60ml) coffee, room temperature (2 tsp instant coffee powder melted in 1/4 cup (60ml) of water)
  • 50g Andes chocolate mint, melted
  • 1/2 cup (120ml) whole milk
  • 1 tsp (5ml) vanilla

For the buttercream frosting: 

  • 2 cups (250g) icing  sugar
  • 1 1/2 stick (170g) unsalted butter, at room temperature
  • 2 tbsp (30m1) whole milk or heavy cream
  • 1 tsp (5ml) vanilla extract
  • 1/2 tsp (2.5ml) peppermint extract
  • green food coloring
  • 1/2 tsp salt
  • 18  Andes chocolate mints

Instructions:

For the cupcakes:

  1. Preheat oven to 350°F (175C) . Line pans with cupcake liners.
  2. In a mixing bowl, sift and combine flour, cocoa powder, baking powder, salt. Set aside.  
  3. In another mixing bowl, using an electric mixer, beat butter, oil, and sugar on medium high speed until creamy and smooth. This will take around 4-5 mins.
  4. Add eggs, one at a time, and continue beating for 1 min. Add coffee, milk and melted mint chocolate, and continue beating for 30 secs.
  5. In 3 batches, pour the prepared dry ingredients into the mixture, and gently stir with a spatula until just incorporated. Do NOT overmix.
  6. Fill cupcake liners to nearly full and bake for 18-20 minutes, until a toothpick inserted in the cupcake’s centre comes out clean.

For the buttercream frosting:

  1. Using an electric mixer, beat the butter at medium-high speed until smooth.
  2. Slowly add in the sifted icing sugar using a tablespoon, and beat until smooth.
  3. Finally, add milk, vanilla, mint extract, food coloring, and salt, and beat until light and fluffy.
  4. Refrigerate the frosting for at least 30 mins before piping.
  5. Pipe the buttercream onto the cupcakes with your favourite piping tip, and put an Andes chocolate mint on top as decoration if desired.

Yum


6 comments