Home Tags Posts tagged with "chocolatedessert"
Tag:

chocolatedessert

Chili Chocolate Tart

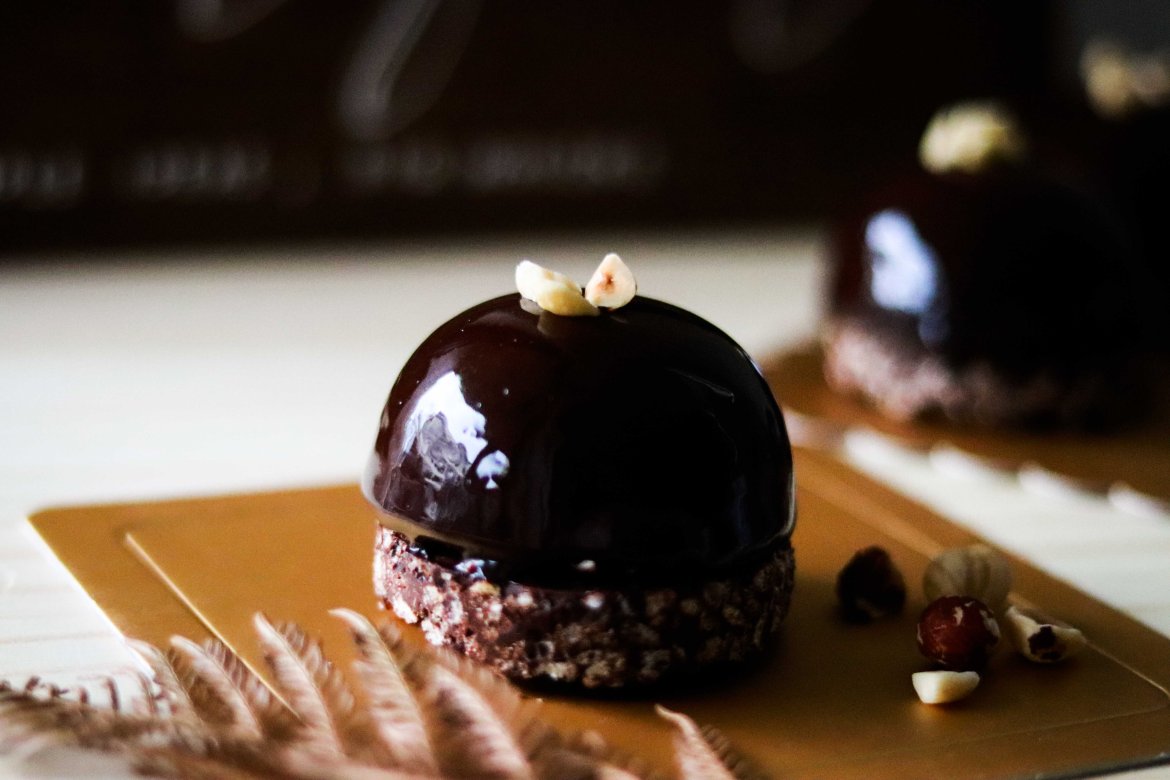
If you’re a chocolate lover, you would always crave a perfect chocolate tart that reminds you of why you ARE CRAZYYY about chocolate in the first place – This Chili Chocolate Tart is IT. It is simple, decadent, and rich in chocolate flavours with a slight kick of chilli. It has a tender chocolate sweet pastry filled with chili chocolate custard filling, finishing off with a shiny cocoa gaze and chocolate shards. The taste of chili is very subtle in this recipe as I personally can’t take spicy very well. However, If you aren’t a big fan of chili, simply substitute it with dark chocolate and it will work just fine!


Chilli Chocolate Tart3.jpg

Chilli Chocolate Tart

I don’t know about you but I have a thing for tarts. As simple as they look, there’s actually so much knowledge, hard work and effort behind to achieve a satisfying result. This is why the sense of accomplishment of finishing a gorgeous tart can be overwhelming (for me).

Chilli Chocolate Tart6.jpg

Chilli Chocolate Tart2

In this post, I am going to tell you the tips of making the best chocolate tart in the simplest way!

    1. Use a food processor (no mess) 
      I was taught various ways of making sweet pastry i.e. cutting method, creamy method etc, but here I want to show you the easier way without getting your hand dirty – using a food processor. All you have to do is to process COLD butter cubes with dry ingredients until fine crumbs, then add in the egg and process until a smooth dough is formed. There’s minimum handling of the dough and you can avoid developing too much gluten in the dough, hence avoid pastry shrinkage when baked.
    1. Rest the sweet pastry dough (no shrinkage)
      One thing that you must have heard when it comes to tarts making is REST THE DOUGH. The reason is that when you need to give time for the gluten that was formed during the dough making process to relax. When making this tart, you will be resting the pastry twice – first, to rest it in a rectangular flat form wrapped by plastic in refrigerator for at least 30 mins before rolling the pastry out for lining; second, to rest the pastry lined in tart rings in refrigerator for another 30 mins to relax the gluten formed during the rolling process. Relaxed gluten won’t shrink as badly (sometimes doesn’t shrink at all) during baking, and you will have a more tender and consistent sweet pastry.
    2. Use a non-stick perforated baking mat when blind baking (no baking beans needed!)
      Have you ever experienced the frustration that even if you have poked thousands of holes in the sweet pastry and even putting baking beans on, your pastry still annoyingly puff up a lot in the oven? Here is the solution for you – use a non-stick perforated baking mat. These perforated mats are amazing that they allow air to escape underneath the pastry and provide optimal destruction of heat. They give a much more consistent baking result and that’s why people are using it for baking a lot of items such as tarts, short bread cookies, macarons etc.
    3. Bake the custard filling at low temperature 
      I know we all love ganache, I mean who doesn’t? But sometimes pure ganache filling can be too heavy as a filling. For my chocolate tart, I used a chocolate custard filling recipe that is slightly different from ganache due to the addition of eggs and milk. The eggs and milk sort of “lighten up” the ganache and make it custard-like. However if you want a smooth finish of the custard filling, you have to bake it at low temperature (120C). I baked my filling at 120C for 10mins and there were no cracks on the surface at all as the filling was cooked slowly and evenly.

Chilli Chocolate Tart5.jpg

Ingredients:

Chocolate Sweet Pastry

  • 240g all purpose flour
  • 95g icing sugar
  • 25g cocoa powder (I used Callebautchocolate ‘s cocoa powder)
  • pinch of salt
  • 120g cold unsalted butter, cut into cubes
  • 50g whole eggs (around 1 egg)

Chilli Chocolate Custard Filling 

  • 180g pure cream
  • 180g Lindt’s chili chocolate (break into small pieces)
  • 15g butter
  • 40g eggs
  • 40g cold milk

Cocoa glaze

  • 70g water
  • 65g sugar
  • 20g neutral glaze
  • 8g glucose
  • 30g cream
  • 15g cocoa powder (I used Callebautchocolate ‘s cocoa powder)
  • 1.5 gelatine sheet (titanium)
  • 40ml water


Instructions:

Make the Chocolate Sweet Pastry , put all purpose flour, icing sugar, cocoa powder, salt and cold butter cubes into a food processor (handle with care and never put your hand near the blade when the machine is on), process on medium speed until fine crumbs. Add in the egg and process on medium speed until a smooth dough is formed. Put the dough on your working surface dusted with flour, flatten it with your hand and shape into a rectangle. Wrap the dough in plastic and rest in the refrigerator for at least 30 mins.

After the resting time, flour your working surface and roll out your dough into 3mm. During the rolling process, you have to move the pastry around constantly and dust flour underneath the dough to ensure that the dough is not sticking to the bench. Poke holes into the pastries evenly with a fork and use a circular cutter to cut out circles that are around 3 cm bigger than the base of your tart rings. Fit the pastry into your tart ring and ensure to check if nice edges are formed at the base. Use a knife to cut off the excess pastry hanging out of the tart rings. Put the tart rings onto a perforated baking mat and rest in the refrigerator for 30 mins. Preheat your oven to 180C.

After the second resting time, bake the tart shells for 10mins. Take out from the oven, let cool slightly, and remove the tart rings carefully.  Brings the oven temperature down to 120C.

Make the Chilli Chocolate Custard Fillingput chocolate pieces into a mixing bowl and set aside. Meanwhile. bring cream to a boil in a sauce pan, immediately pour hot cream over the chocolate. Let it sit for one min, then stir with a whisk until completely melted. Stir in the butter butter and and stir until melted. Add in cold milk , then egg into the ganache. Mix with a whisk until just incorporated. Fill the tart shells with the custard filling until it’s just 4mm away from the tart shell top edge. Bake at 120C for 10mins. Let cool in room temperature for 10 mins then put in refrigerator while you prepare the cocoa glaze.

Make the Cocoa glazebloom gelatine sheet with 40ml water, set aside. Bring all the other ingredients to a boil in a saucepan, off heat, stir in the bloomed gelatine and whisk until completely dissolved (try to avoid making any bubbles). Cool in room temperature for 15 mins. Take out the cooled tarts from the refrigerator, pour the glaze carefully on the set custard filling until it’s just full. Refrigerate the tart for at least 1 hour to set completely. Decorate with chocolate shards and gold leaves if desired. These tarts are best to consume within three days.


2 comments
Boozy Bite – Guinness Double Chocolate Brownies


Guinness Double Chocolate BrowniesGuinness Double Chocolate Brownies

Another chocolate dessert for you all! These Guinness Double Chocolate Brownies are luxuriously rich and moist, carrying a hint of roasted malt taste from Guinness that intensifies the chocolate flavour of these brownies. If you haven’t noticed, I really like adding alcohol to my desserts for some boozy, delicious treats, and this time I choose to use Guinness – an Irish dry stout that has a distinctive burnt, malty flavour from roasted barley. If you’re interested in alcohol infused desserts, feel free to check out my other posts:

Hazelnut Dark Chocolate Mousse with Baileys Ladyfingers (topped with chocolate soil)

Coconut Rum Pecan Banana Bread

White Wine Poached Pear Almond Tart

Coffee Liqueur Double Dark Chocolate Hazelnut Muffin

Lemon Curd Limoncello Meringue Éclair

Guinness Double Chocolate Brownies

Guinness Double Chocolate Brownies

As I planned to use this brownie as the base for my Salted Caramel Stuffed Brownie Truffle (recipe coming soon!), I purposely toned down the sweetness of these brownies through using smaller amount of sugar, as well as using chopped dark chocolate that oozes out from the brownies when baked. With the addition of the Guinness, these brownies have a strong malt,  and bittersweet chocolaty finish which I personally love. However, if you have a serious sweet tooth, free feel to adjust the sweetness by adding an extra 50g white sugar to the batter. Thank you for reading and I hope you’ll have fun making these delicious brownies for a special occasion! (or anytime really- I mean, who needs a reason to eat brownies?)

Guinness Double Chocolate Brownies

Ingredients:

  • 100g butter, softened
  • 60ml vegetable oil
  • 200g white sugar
  • 50g brown sugar
  • 2 eggs, room temperature  
  • 180ml guinness
  • 1 tsp vanilla
  • 180g all-purpose flour
  • 100g cocoa powder
  • 100g chopped dark chocolate

Instructions:

  1. Preheat oven to 180C. Grease and line a square or rectangular baking tray and set aside.
  2. In a mixing bowl, sieve and add flour and cocoa powder. Set aside.
  3. In another mixing bowl, using an electric mixer, beat butter, vegetable oil, white sugar, brown sugar on high speed until light and fluffy. Scrape the mixing bowl in between if needed. This is will about 5 mins.
  4. Reduce speed to medium, add eggs ( one at a time) and beat until well combined.
  5. Add guinness and vanilla, mix until well combined.
  6. Add the prepared flour and cocoa powder, mix until just incorporated.
  7. Fold in the chopped dark chocolate.
  8. Pour the batter into the prepared baking tray. Bake for 25 mins or until until a skewer inserted in the centre comes out with moist crumbs clinging. Do not overbake. Set aside to cool. Enjoy!

 
Yum


1 comment
Layers of goodness – Hazelnut Dark Chocolate Mousse Sphere (with Coffee Creme Patissiere & White Wine Poached Pear & Crispy Chocolate Base)

This post is all about celebration – about finishing my first basic term @LCB passing all my assessment, about flying to Brisbane in a few days for vacation, and about finally successfully making a mousse sphere for the first time (after contemplating on it for a thousand years). This hazelnut chocolate mousse sphere is my cup of tea, hands down – it marries my favourite flavours into one dessert that tastes absolutely divine. I’ve always wanted to make mousse spheres but I was too scared to, until I recently watched Zumbo’s just dessert which motivated me to be a better “dessert maker”. While I was watching all those amatuer home-bakers produce their eye-opening, beautiful desserts, my heart ached for creating some of my own.

hazelnut_mousse_sphere_with_mirror_glaze4hazelnut_mousse_sphere_with_mirror_glaze7

IMG_7758

As I said, this dessert is celebratory, so I decided to apply some of the skills I learnt from school to it. It is also inspired by the Shiny Mirror Glaze Mousse Dome with Crispy Chocolate Base and Ganache Topping created by Cupcake Savvy’s Kitchen. Cutting through the sphere, you get a smooth French hazelnut chocolate mousse, creamy coffee creme patissiere, and a layer of refreshing poached pear that balances the richness & sweetness of chocolate. The dessert’s crunchy texture is provided by a crispy rice puff chocolate base (who doesn’t like indulging him/herself in loads of cocoa rice puffs???), and I finished it off with a shiny chocolate mirror glaze that renders the dessert a sophisticated look. How does that not sound heavenly?

hazelnut_mousse_sphere_with_mirror_glaze3

Special thanks to my friend who made me this stunning board with my baking motto – Simple Ideas, Big Whisks – written on it. <3 hazelnut_mousse_sphere_with_mirror_glaze10

hazelnut_mousse_sphere_with_mirror_glaze5

Realistically speaking, baking at home can be a bit tricky at times because you don’t always get the equipment or tools you need for your recipe. Like this time, I didn’t have a smaller sphere mold for my coffee creme patissiere so I had to carefully spoon it into the large mold, which could create a bit of a problem in terms of even layerings. But well, as as a pastry chef wanna-be, I need to be adaptive and make use of what I’ve got at home. Although the end result isn’t as perfect as I wanted, I am already quite happy with it. Anyway, give this recipe a go – If you are a hard-core chocolate fans, I think you will fall in love with it. Have a good weekend!

Ingredients:

Hazelnut Dark Chocolate Mousse

  • 150g dark chocolate
  • 50g butter
  • 3 egg yolks
  • 3 egg whites
  • 35 caster sugar
  • 25g nutella

Coffee Creme Patissiere (coffee pastry cream)

  • 150g milk + 1 tsp instant coffee powder
  • 1 tsp vanilla
  • 1 tbsp coffee liqueur
  • 25g egg yolk
  • 25g caster sugar
  • 10g corn flour
  • 10g butter

White Wine Poached Pear

  • 2 fresh pear, cored
  • 300ml white wine
  • 300ml water
  • 60g caster sugar
  • 1/2 tsp vanilla
  • 1/2 orange, zest of
  • 1/2 cinnamon stick

Crispy Chocolate Base

  • 200g dark chocolate
  • 100g choco rice puff

Chocolate Mirror Glaze

  • 100g sugar
  • 35g cocoa powder
  • 40g water
  • 70g double cream
  • 1 1/2 tsp gelatin
  • 1 1/2 tbsp water

Instructions:

Hazelnut Dark Chocolate Mousse

  1. Using a double boiler, melt the chocolate on low heat until melted. Let it cool slightly. Stir in butter and nutella. Set aside.
  2. Using a whisk, lightly beat egg yolks until pale and creamy. Add to the chocolate mixture, mix well.
  3. Using an electric mixer, beat egg white until foamy. Gradually add sugar and beat egg white to stiff peaks.
  4. Gently stir in the chocolate-egg yolk mixture (in three additions) into the egg whites, mix until no obvious egg white is visible.  
  5. Refrigerate until ready to use.

Coffee Creme Patissiere (coffee pastry cream)

  1. Using a saucepan, heat milk and instant coffee powder over medium heat and bring it to boil.
  2. While the milk is being heated, add egg yolk, sifted corn flour, caster sugar in a bowl. Mix well with a whisk until you can a thick, creamy consistency.
  3. With a steady mixing motion, pour 1/3 of the milk mixture to the egg mix to temper the egg.
  4. Pour the above mixture into the saucepan and cook over medium heat while whisking vigorously for at least 3 mins, until all starch is cooked. You will know it’s almost ready when it starts to bubble. Continue cooking for 1-2 mins. Remove it from the heat.
  5. Whisk in the butter and coffee liqueur until incorporated.
  6. Pour the custard into a bowl and cover the custard surface with a plastic wrap. This will prevent a skin from forming on top.
  7. Let the custard cool to room temperature. Refrigerate until ready to use.

White Wine Poached Pear

  1. Put all ingredients (except the pears) in a pan.
  2. Peel and core pears, gently poach (NOT boil) pears in syrup.
  3. Cook the pears for about 1 hour until they are soft. Use a stick to test every once in a while to see if the pears are done.
  4. When done, take out the pears from the pan to stop the cooking process.
  5. Cut one poached pear into small cubes, and blend the another one into puree or mash it with a fork. Pour the pear cubes into the puree and mix well. Refrigerate until ready for use.

Crispy Chocolate Base

  1. Using a double boiler, melt chocolate on low heat until melted. Pour the chocolate onto the rice puff and shape the mixture into a 2-cm thick layer.
  2. Refrigerate for at least 30 mins, and use a circular cutter that fits the size of the spheres to cut 6 circular bases. Refrigerate until ready to use. (If the base is too hard to cut through, run the cutter in a hot water bath and dry it before usage.)

Chocolate Mirror Glaze

  1. Add gelatin and cold water into a bowl. Stir and set aside until ready to use.
  2. In a saucepan, add sugar, cocoa powder, water and cream. Mix well with a whisk.
  3. Over medium heat, bring the mixture to boil while stirring continuously. Cook for about 2 mins until the mixture is smooth and no lump is visible.
  4. Turn off the heat, add the gelatin mix and stir well.
  5. Set aside and let cool to at least 35 C for usage.

Assembly

  1. Put the hazelnut chocolate mousse into the mold. Smoothen out the surface with a spoon until you can an even layer as the outer layer of the sphere. Freeze for 15 mins.
  2. Then, put the coffee creme patissiere in the mold. Freeze for 15 mins.
  3. Then, pour the pear mixture into the mold. Leave some space for the next step of closing the sphere with the hazelnut chocolate mousse. Freeze for 15 mins.
  4. Then, close all the spheres with a thin layer of the hazelnut chocolate mousse. Smoothen the surface with a off-set spatula. Freeze for at least 3 hours or preferably overnight to let it set completely.
  5. Carefully push the spheres out of the mold and put them on to a cooling rack. Pour the mirror glaze (at 35 C). Set it set. And put the glazed sphere on to the circular chocolate base.
  6. Sprinkle some chopped hazelnut on top as decorations.

Yum


8 comments